RV Mobile Internet System Installation
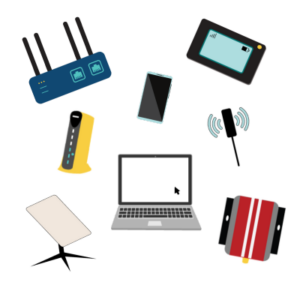 You've selected your mobile internet gear and now it's time for installation of antennas, routers and cabling on your RV or boat.
What's the best approach for doing that?
Like many things in mobile internet - installation depends on what kind of gear you have, what type of RV, van, or boat you have, and your particular needs and mobile lifestyle.
You'll probably want your gear to be accessible but not cluttering up your living space.
All this gear will require power to keep it running, and there will likely be a collection of cables that can easily become a rat's nest. Maybe you have antennas on the roof and need to figure out how to get the cables for them routed inside.
Approaching installation may seem daunting, especially if you have a lot of mobile internet gear or more complicated setup requirements. Drilling holes into your RV or boat can be scary, and fishing wires through tight walls is difficult.
But it doesn't have to be.
This guide covers considerations for installing your mobile internet gear, getting power to your gear, and other factors like adequate ventilation in your RV or boat.
It also introduces our preferred mobile internet installation approach for most RV and boat nomads: centralizing your gear in one spot, such as a dedicated tech cabinet.
If you're a member, please log in above to see your exclusive content.
Don't need a membership? Other ways you can support our work here:
-
As seen in our videos!
-
Get a FREE Month of Starlink!
And our team will get one too!
-
Get a FREE Month of T-Mobile Unlimited Data
Join the Calyx Institute, and get a bonus month - and we do too!
-
Save $20 on Visible
Verizon's prepaid phone plan, we also get a $20 credit.
-
Share About Us!
Link to our content, tell others about MIRC. It's Free!
It is with huge gratitude to our members for making the free unbiased educational content on our site possible.
Our members get exclusive access to our in-depth content, classrooms, vendor discounts (that can save you more than membership!), alerts, insider info and interactive guidance. They can even book private advising sessions.
If mobile internet is an important part of your lifestyle, consider helping make MIRC possible by joining or supporting our mission.
The Tech Cabinet RV Mobile Internet Installation Approach Video
Here's our 14-minute video, filmed in September 2023, that discusses the Tech Cabinet Approach for Installation Your Mobile Internet Gear in an RV or boat.
The Tech Cabinet Approach for RV Mobile Internet Installation
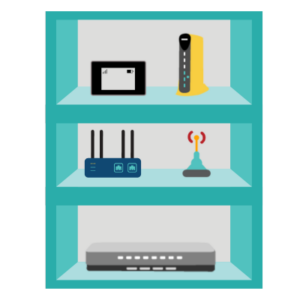 A centralized "tech cabinet" is what we recommend for most RV and boat nomads who have mobile internet gear they are approaching installation on a permanent or semi-permanent basis.
But it doesn't have to be an actual cabinet - the key is centralizing your gear in one spot.
This centralization addresses many considerations of installation of your mobile internet gear in an RV or boat.
In a house or office, this is the area where internet cables enter from the outside world and are plugged into tech gadgets like modems, routers, backup drives, and servers.
Since mobile dwellings are typically smaller than a house or office, most folks don't have the space to dedicate an entire room to storing tech gadgets.
Instead, mobile internet gear tends to end up in a cabinet - or, what we call - a Tech Cabinet.
The Benefits of Centralization
Centralizing all of your tech gadgets will end your need to hunt down a hotspot or booster when you suddenly notice buffering while in a video conference.
It also allows you to optimize signal enhancement inside your rig or boat.
No more hunting down which window will work best for your antenna at a given location - a tech cabinet will give you a destination to route wiring of your antennas from a roof or other exterior location. You can also plan around consistent antenna separation to defeat the evils of booster oscillation (see our Cellular Boosters Guide for more info).

Mobile internet gadgets tend to require power sources. A tech cabinet can provide you with a centralized option for powering all of your gadgets.
No more fighting with your partner about whether having the coffee maker or the hotspot plugged in is more important; with a tech cabinet, your mobile internet gadgets have a dedicated power feed.
More advanced networkers will also find that a tech cabinet will provide a specific area to bring together wired Ethernet.
Having the option to wire devices is very useful for those who utilize a lot of local traffic. Being able to divert some of your internet traffic from Wi-Fi to a wired connection is a huge plus if you want to maintain speeds.
Having a centralized location to connect your devices will limit the number of cords running across your mobile space, saving you from accidental mishaps.
Do You Need a Tech Cabinet for your RV Mobile Internet Installation?
A tech cabinet is a good idea if you have a lot of gear and want to have it installed in a fixed location. But there are a few cases where it might not be needed.
The most common case is those who rely on smartphones and mobile hotspots for connectivity. Most people like having their phones within reach, and a mobile hotspot device is highly portable and easy to move where needed - either near a window for a better signal, or a laptop or other device to provide a direct connection.
But once you start getting into more advanced gear and multiple pieces of gear, centralizing makes much more sense.
Locating a Tech Cabinet
If you need a centralized location, the next step is to determine the best location.
This may be an easy or challenging choice, depending on a host of different factors. In the member section of this guide, we deep dive into these, but here is an overview of the factors, starting with the two most important:
- Power - Since gear requires power, access to AC and/or DC power is necessary
- Room - The space has to be big enough to hold your gear.
Depending on your setup and your mobile conveyance, you may need to consider additional factors:
- RV/Boat Construction - RVs or boats made of metal or using signal-blocking metal insulation, will need to factor that in.
- Outside Access - You may need access to the outside - one common example is for external antennas.
- Ventilation - Electronics can get hot - you may need to consider ensuring the gear has adequate ventilation for cooling.
- Networking and other gear - The location should be sufficient for Wi-Fi coverage or to provide any needed wired Ethernet connections. And you may want to centralize other gear to the tech cabinet for convenience.
- Ease of Access - You'll want to be able to easily access your gear to change SIM cards, troubleshoot, etc.
- Upgrades - If you plan to add additional gear in the future, or upgrades, planning for that at the start can help.
- Esthetics - You may want gear neatly hidden away, or in vision to check status at a glance. Or maybe you love or hate blinking lights.
DIY or Professional RV Mobile Internet Installation?
One question we're often asked about is professional mobile internet installers for RV or boats. Not everyone has the time, skills or RV, boat, or systems knowledge to feel comfortable approaching installation on their own. So why not hire a professional?
Hiring a Pro
The problem is that "mobile internet RV installation" really isn't a specific job title or role that a professional will specialize in.
If a DIY installation is outside of your comfort zone, then definitely seek a professionally certified RV technician, especially for anything that involves elements that can cause harm to you or your RV or vessel.
Generally, any RV or boat service shop or mobile RV or boat tech should be able to assist, but we've found that many do not want to do installations of gear they don't sell or are not directly familiar with. Even though there's really not much specific to mobile internet gear that is substantially different than installing a satellite TV dish, air conditioner, or new wiring.
So if you want a pro, you'll need to do your homework to find one you're comfortable with.
DIY RV Mobile Internet Installation
 If you're moderately handy, installing your mobile internet setup yourself is an accessible and approachable project. We do recommend consulting with a user group or forum dedicated to your RV or boat's model for specific installation tips from those who have done it before. These can often be extremely valuable sources of information that can't be found anywhere else.
The most difficult parts of an installation are usually anything that requires running cables, especially using any outdoor gear wired to indoor gear. Installing rooftop or outdoor gear can sometimes be challenging as you'll need to maintain a proper seal on the exterior to protect against water ingress.
Any special power requirements and wire runs between your central gear and where you need your internet connection can also create a surmountable challenge.
It's important to spend the time to think through the best way to accomplish this, have all the tools and parts needed before beginning, and be ready for any contingencies that might crop up.
Mobile Internet Installation RV Resources
In addition to the more detailed considerations and advice in the member section below, we also have more detailed guides and content related to the installation of mobile internet gear:
Installing Mobile Internet Antennas
Member Exclusive Content Below
Member Exclusive Content In This Guide
Has this guide been helpful so far?
Well.. there's a lot more below available to our members. As well as dozens of other guides like this, videos, classrooms, forums, webinars and more. All specifically created for helping keep RVers, cruisers and nomads online.

Consider Becoming a Member
If mobile internet is an important part of your lifestyle, a membership can help keep you connected with these exclusive benefits:
- in-depth exclusive content
- interactive guidance
- vendor discounts
- alerts & insider tips
- classroom
- community
Free Content Like This Made Possible By Our Members!
We are community funded via our premium membership program - allowing us to focus on creating unbiased quality, in-depth, constantly updated content. We don't accept 3rd party advertising, we're not sponsored and we don't sell 'stuff'.
Already a member?
Log in to continue with this guide.
Check out the Topics Covered in the Member Section:
Tech Cabinet Deep Dive
We go much deeper into tech cabinet considerations and factors about where to place your gear, wiring, power sources, ventilation, and those annoying, blinking lights that come standard on electronics.
Gear Placement Advice
We dive deeper into the placement and installation of different types of gear.
Tech Cabinet Examples
We show several real-world tech cabinets from our members and staff who shared tours of their tech cabinets for inspiration.
Conclusion: Mobile Internet RV Installation
We recommend the tech cabinet approach when approaching installation of your mobile internet system - at least for most people.
Having a dedicated centralized location for your gear is a great way to keep all of your gear organized and accessible. But since every RV, van, or boat is different, and everyone has unique needs and a different mix of equipment, determining the right location is highly individualized.
Be sure to consider placement, wiring, power sources, ventilation, and the other factors listed in this guide when selecting and installing your setup.
Additional Reading
Related Guides
- Before You Can Assemble a Mobile Internet Setup, You Must First Understand YOUR Unique Needs
- Cellular & WiFi Antenna Installation Guide for RVs and Boats
- Selecting a Mobile Router - Bringing Mobile Internet Options Together and Creating a Local Network
- Selecting Antenna Cables, Connectors, and Adapters for Cellular & WiFi Devices
Explore the Resource Center


Have Questions?
Join our 'Library Desk':
Internet for RVers & Cruisers Facebook Group
We cross post news articles and guides, and can help point you in the right direction to our content here on the resource center.
It is with gratitude to our premium members that we're able to offer our free content - and for that, they also have access to our member Q&A areas for more in-depth guidance.
Become a Member
 The MIA is our premium membership - designed for those who consider mobile internet an important part of their lifestyle.
In thanks for making content like this possible, we offer a bunch of additional perks. From interactive guidance, in-depth member exclusive content, discounts, alerts, classroom and ability to book private advising sessions.
Stay In the Know
We're constantly tracking the industry and analyzing new developments for mobile travelers. If you'd like to receive updates, we offer several ways:
- Subscribe to our free monthly newsletter
- Subscribe to our News Stories RSS Feed
- Subscribe to our YouTube Channel
- Follow our Facebook Page


